
Photographing Your Own Artwork
People in the arts are disciplined to keep a record of the artwork they produce in order to show their art either on a website art show, a gallery exhibit, or for acceptance into a university program of study. The full circle of the creative process is to share your work with an audience. To be accepted into an art exhibit, the jurors screen the applicants by the artist submitting digital images of their work for the juror’s viewing, and likewise, a university jury reviews your art portfolio to be accepted into a university art program. Some universities want to see the actual art, but many want the photographs of it (especially 3-dimensional that is impractical to deliver) To successfully do this, you must have a professional photographer take the photos of your work, or have your own camera to shoot the images and a computer for editing the image. The following are some practical suggestions in photographing
your art:
1. Fill the frame
When photographing your artwork, make sure to fill the frame of your camera’s viewfinder with the piece of artwork that is your subject. Imagine that the four edges of the viewfinder are the picture frame around the picture you are taking. Move in close! Try to avoid having the subject of your photo appear too small in the image. A photo in which the subject fills the frame will clearly show the details of the artwork, which is important to potential customers who only have the photograph on which to base a buying decision. With digital photography, you can edit the image by cropping the unessential space around the art work.
When moving in close to fill the frame, make sure that your camera’s lens can focus at the distance you are shooting from. Most cameras have a close-up setting. If you move in too close without changing the setting, the lens may not be able to focus down to render the subject sharply and will turn out blurry.
2. Avoid on-camera flash
Turn off the camera’s flash function. Because most people have cameras with built in flash, this tip can be a tough one to follow. However, on-camera flash hits a subject straight-on and gives it an unappealing flat appearance, creating an image that lacks depth and texture. On-camera flash will also cause harsh shadows to be thrown against the background if the background is too close to the subject. If the artwork being photographed is a flat painting or reproduction print, the straight-on flash will likely cause a bright “hot spot” on the surface of the work and render the image unusable.

Fill the picture frame.
No unessential space.

Professional equipment
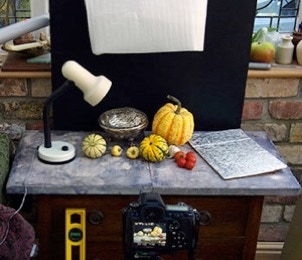
3. Indoor photographing . Professional photographers have off-camera flash units, light stands, umbrellas, etc. at their disposal to create a lighting setup. But with digital camera and a good photo software in your computer, you can get by with minimallighting - natural from window or a
table lamp (see photo)
4. Three- dimensional art. Obviously, most artists, are not equipped with professional photography equipment. Most of you saw how I set things up for photographing your three-dimensional art work –with no direct sunlight on the art, near a window. (Actually it was North light coming through the window) With an indirect light source, you get the important soft shadows on the sculpture that give it dimension.) In my own workspace at home I use velvet fabric as a backdrop, I went to the fabric store and bought some velvet fabric – black as a backdrop for light colored artwork, grey for dark colored artwork. Taping the top to a wall the end forward over a table or stand, place the art about 18 inches from the vertical part of the draped cloth and this will give you a neutral void, with no other distracting things around it. Another approach in good weather, take your artwork outside and photograph it.
5.Photographing your artwork outside. When photographing your artwork outside, you may shoot either on a sunny day or on an overcast day. Each type of light will give you a different effect.
Use a lamp with dark backdrop.
Two-dimensional art (drawings and paintings. Best results is to photograph outside on the sidewalk or grass on an overcast day the light is most even then. If it is winter then put the piece on the floor with even over head ceiling lights. Doing the latter, and artificial light being what it is, you’ll probably have to manipulate the photo-image on your computer to get colors that are closest to that in the painting. Pencil drawings aren’t as complicated.
For 2-dimensional artwork, such as paintings and reproduction prints, bright sunlight is OK, but photograph it flat on the ground. This kind of light will vividly bring out the colors of the work. If the artwork is positioned at a slight angle to the sun, the texture and brush strokes of an original painting may be emphasized as the irregularities of the surface will cause tiny shadows to appear on the work.
For 3-dimensional artwork outside, overcast lighting conditions are usually best. The danger of shooting 3-dimensional artwork in bright sunlight is that this lighting can cause harsh shadows to appear in certain areas of the work. Better to shoot 3-D artwork outside on an overcast day when the light is soft and omni-directional. Another advantage of photographing your artwork outside is that artwork almost always shows well in a natural setting.(see photo below) Try laying your jewelry on slate or granite; place your ceramics on a stump. Show off the colors of your glasswork by setting them on a board, and photograph them with the sunlight shining through from behind. Try bringing your artwork outside to photograph; you will probably have a lot of fun with the project!
6. Pay attention to the background
It is easy to get so caught up in the details of photographing your artwork that you forget to look at the background in the image. However, if a background is distracting enough it can significantly reduce the impact of your image. (2-dimensional artwork, such as paintings and reproduction prints, should fill the frame entirely and the photograph should show no background.)

Using natural light from window. Note how far forward fruit is from backdrop - avoids folds in cloth showing. After the image is cropped in your computer photo software, the inset shows the framing with no unessential empty space around it.
For 3-D artwork, try to avoid household items, like tables, lamps, doors, floors, etc. from showing up in the background unless the artwork specifically relates to the item. If shooting outdoors, avoid the “telephone pole sticking out of the top of the head” (of the object) syndrome. Often a slight adjustment in camera position or subject position is all that is needed to give you a “clean” background. If you have a camera that allows you to manually set the aperture (f-stop), open the aperture up wide (f/4.5 or f/5.6) to throw the background out of focus. This technique is very effective for making the artwork “pop” off the page and focuses the viewer's attention squarely on the subject, your artwork.
Avoid using camera flash, creating harsh shadows that show up in the background behind the artwork. Avoid backgrounds made of material that show creases or any background that looks cheap or dingy.
7.A tripod is useful if you don’t have a hand-held camera that compensates for motion (see table-top photo image above)
Or at least brace yourself against a solid object when you trip the shutter release. After carefully setting up your artwork and utilizing the tips listed above, you don’t want to cause the photograph to come out blurry because of camera shake. If you don’t have a tripod and it is not possible to brace yourself against a solid object, brace the arm supporting the weight of the camera against your body. Take a breath and exhale completely. Then, gently squeeze the shutter release.
You can also stand over the painting, avoiding any shadow on it and click the shutter button. The photo above, is a professional set-up, but with modern digital cameras with anti-motion function, the simple, direct hand held process under most light conditions will work for you. Any color that is off, can usually be rectified in the photo software in your computer.

Pottery or sculpture in the garden, sitting on a tree stump.
For further tips on photographing, click on link below: